
One of the greatest things about crochet bags is that they are extremely versatile. They can be used for any occasion. You can make them in any size or shape as you desire.... right from a small crochet gift bag to a large Crochet Tote Bag, Purse , Market Bag, Beach Bag or an elegant evening bag. Crochet Bags are not only pretty but also very functional and practical.
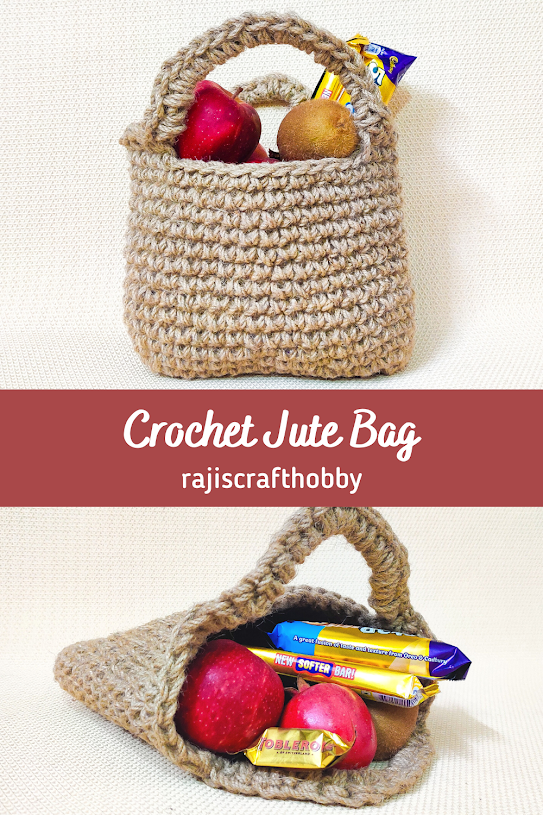
Today am sharing the pattern for this quick and easy Rustic Crochet Jute Bag. I love the rustic feel of jute twine. Crochet Patterns made with Jute twine are beautiful to look at and they are extremely strong , durable and sturdy. They are just perfect for crocheting Bags and Large Laundry Baskets. They are also great for many more DIY crafts for your home. The Jute Twine being quite sturdy gives the finished bag a sturdy shape and prevents it from stretching. The crochet stitches used are basic making it beginner friendly. In this crochet pattern, the handles are crocheted from jute twine too. If you wish, you can try replacing it with ready made handles. These ready made handles will definitely give a different look to this bag.
You might find the Jute twine a bit rough and hard to work with. If you find it hard to pull out the stitches, try changing your hook size or try holding the twine in a different way for more comfort and keep the stitches loose. Working with Jute can be messy too 'coz they leave back little particles of the fibers, but its fun and worth making Crochet Projects with them.
Materials Used:-
3 Ply Jute Twine Cord
6 mm Crochet Hook
Size:-
Base - 9''/2''
Bag Size - 7''/10''
Notes:- For this whole Pattern the Starting Chain 1 will not be counted as a stitch. It is just to bring the yarn to a working height.
Start the next stitch in the same stitch.
AD-FREE, PRINTER-FRIENDLY PDF PATTERN:
The written pattern and photo tutorial is given below along with a free video tutorial. This pattern is also available as an ad-free, printer-friendly pdf pattern that can be purchased on Ravelry. Please click the link below to purchase the PDF Pattern.
Here is the Video Tutorial:-
You can follow along with this tutorial video. Please be sure to subscribe too! It would mean a lot to me.
Pin it and Save for Later:-
Round 1:-
Start with a Slip Knot.
Chain 16.
1 Single Crochet in the 2nd Chain from the hook.
1 Single Crochet each in the remaining stitches untill the last stitch.
3 Single Crochets in the last stitch.
Continue working on the opposite side. Take the yarn end along with the working yarn. This will give a neat finish.
1 Single Crochet each in stitch untill the last stitch.
3 Single Crochets in the last stitch.
Slip Stitch on top of the 1st Single Crochet.


Chain 1.
1 Single Crochet in each stitch untill the turning 3 Single Crochets.
2 Single Crochets each in the turning 3 Single Crochets.
Continue working 1 Single Crochet each in the remaining stitches untill the next corner.
2 Single Crochets each in the turning Single Crochets.
Slip stitch on top of the 1st Single Crochet.
If you wish to make a larger size bag:-
This base measures 9''/2''.
Keep making the increase rounds to make a larger size base.
Checkout these tutorials to increase the base size.


Chain 1.
1 Single Crochet in each stitch around.
Once you reach the end, do not slip stitch. We will be working in continuous rounds.


1 Single Crochet in each stitch around untill the size needed.


- Even if you are not keeping a count of the stitches, its very easy to gauge on where to put the handles.
- Just fold the bag in half and gauge the mid point.
- Count Back 4 stitches from the middle stitch(middle stitch not to be counted) and mark the next stitch with a stitch marker. This will be the starting point of the handle. Again, count forward 4 stitches from the mid point and mark the next stitch. This will be end point of the handle.
- Repeat the same for the 2nd handle on the opposite side.
1 Single Crochet in each stitch untill the marked stitch.
Chain 16.
1 Single Crochet into the stitch next to the marked stitch(1st Handle made)
Continue with 1 Single Crochet in each stitch untill the next marked stitch.
Repeat the same for the 2nd handle too.


1 Single Crochet inn each stitch in untill the handle.
16 Single Crochets into the handle loops. While making the single Crochets, Yarn over the whole handle loop.
Continue with 1 Single crochet in each stitch untill the next handle.
Repeat the same for 2nd handle.
Once you reach the end, slip stitch and weave off.


Here is the Summary of the Pattern:-
Round 1:-
Start with a Slip Knot.
Ch 16.
1 SC in the 2nd Ch from the hook.
1 SC each in the remaining Sts untill the last St.
3 SCs in the last St.
Continue working on the opposite side. Take the yarn end along with the working yarn. This will give a neat finish.
1 SC each in St untill the last St.
3 SCs in the last St.
SL on top of the 1st SC.
Round 2:-
Ch 1.
1 SC in each St untill the turning 3 SCs.
2 SCs each in the turning 3 SCs.
Continue working 1 SC each in the remaining Sts untill the next corner.
2 SCs each in the turning SCs.
SL on top of the 1st SC.
Round 3:-
Ch 1.
1 SC in each St around.
Once you reach the end, do not SL. We will be working in continuous rounds.
Round 4 Onwards:-
1 Single Crochet in each stitch around untill the size needed.
Handles:-
Even if you are not keeping a count of the Sts, its very easy to gauge on where to put the handles.
Just fold the bag in half and gauge the mid point.
Count Back 4 Sts from the middle St(middle St not to be counted) and mark the next St with a St marker. This will be the starting point of the handle. Again, count forward 4 Sts from the mid point and mark the next St. This will be end point of the handle.
Repeat the same for the 2nd handle on the opposite side.
1 SC in each St untill the marked St.
Ch 16.
1 SC into the St next to the marked St(1st Handle made)
Continue with 1 SC in each St untill the next marked St.
Repeat the same for the 2nd handle too.
Border:-
1 SC inn each St in untill the handle.
16 SCs into the handle loops. While making the SCs, Yarn over the whole handle loop.
Continue with 1 SC in each St untill the next handle.
Repeat the same for 2nd handle.
Once you reach the end, SL and weave off.
*********


No comments:
Post a Comment
Thank you for taking time to stop by. I would love if you leave some inspiring comments about the post. To avoid spam , your comment will be verified and posted in sometime. Thank you!!!