

Crochet Baskets are Perfect for Home Storage. They are a great option if you are looking out for a quick organizing crochet project. The fun and the most awesome thing about making a Crochet Basket is that, you can make them in size of your choice with the same pattern. Using the same pattern you can make them in various sizes of your choice by increasing the number of rounds in the base of the basket. Using different yarns gives you a different textured basket. They are of course pretty easy and quick to make.
Today am sharing the Pattern for this very useful Crochet Rectangle Basket with Dividers made in rounds. The dividers make the basket even more handy and easy to sort out your knickknacks. These are perfect for storing toys , yarn , needles or make them in bigger size and you can also store blankets , laundry and more.
I prefer using thicker yarn like T-shirt yarn, Bulky or Chunky yarn. They make those Crochet Baskets sturdy and stiff. You can make one with any yarn of your choice...... Chunky Yarn..... Macrame Chord....Jute Twine... or just use Two or Three strands of yarn to give it a bulky texture. Just remember to change the hook size according to the yarn you would like to use.
Materials Used:-
Bulky Yarn
6 mm Crochet Hook
Size:-
9/5 Inches- Can be Customized to any size of your choice.
Notes:-
For the whole pattern the Starting Chain 1 is not counted as a stitch.
It is just to bring the yarn to a working height.
AD-FREE, PRINTER-FRIENDLY PDF PATTERN:
The written pattern and photo tutorial is given below along with a free video tutorial. This pattern is also available as an ad-free, printer-friendly pdf pattern that can be purchased on Ravelry . Please click the link below to purchase the PDF Pattern.
Here is the Video Tutorial:-
Round 1:-
Start with a slip knot.
Chain 11.
1 Single Crochet in the 2nd Chain from the Hook.
1 Single Crochet in rest of the stitches untill the last stitch.
1 Single Crochet in rest of the stitches untill the last stitch.
3 Single Crochet in the last stitch.
Continue working on the opposite side.
1 single each in rest of the stitches untill the last stitch.
1 single each in rest of the stitches untill the last stitch.
3 Single Crochet in the last stitch.
Slip stitch on top of the 1st Single Crochet.


Round 2:-
Chain 1(Not Counted as a Stitch)
1 Single Crochet in the same stitch.
1 Single Crochet in the same stitch.
1 Single Crochet each in rest of the stitches untill you reach the turning 3 Single Crochets.
3 Single Crochets and mark the 2nd stitch with a stitch marker.
This would be the stitch for making the increase in the next round.
This would be the stitch for making the increase in the next round.
1 Single Crochet in the next Stitch.
3 Single Crochets in the next stitch.
Again mark the 2nd stitch with a marker.
Continue with 1 Single Crochet in the remaining stitches untill the next turning 3 Single Crochets
Again mark the 2nd stitch with a marker.
Continue with 1 Single Crochet in the remaining stitches untill the next turning 3 Single Crochets
Repeat the same on this side too.
3 Single Crochets and mark.(Mark the middle stitch)1 Single Crochet in the next Stitch.
3 Single Crochets in the next stitch.(Mark the middle stitch)
Slip Stitch on top 1st Single Crochet.


Chain 1(Not Counted as a Stitch)
1 Single Crochet in the same stitch.
1 Single Crochet in the same stitch.
1 Single Crochet each in rest of the stitches untill you reach the turning 3 Single Crochets.
3 Single Crochets and mark the 2nd stitch with a stitch marker.
1 Single Crochet each in the next Stitches untill the next corner.
3 Single Crochets in the next stitch.
Again mark the 2nd stitch with a marker.
Continue with 1 Single Crochet in the remaining stitches untill the next turning 3 Single Crochets
Again mark the 2nd stitch with a marker.
Continue with 1 Single Crochet in the remaining stitches untill the next turning 3 Single Crochets
Repeat the same on this side too.
3 Single Crochets and mark.(Mark the middle stitch)1 Single Crochet each in the next Stitches untill the next corner.
3 Single Crochets in the next stitch.(Mark the middle stitch)
1 Single Crochet each in the next Stitches.
Slip Stitch on top 1st Single Crochet.
Slip Stitch on top 1st Single Crochet.


Round 4 Onwards:-
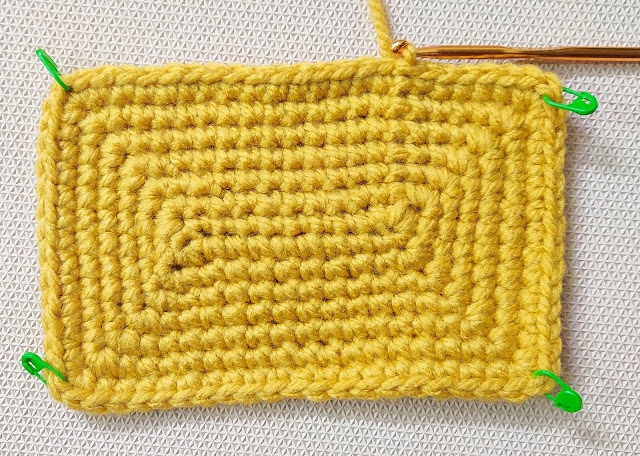
Keep Repeating round 3 untill you reach the size needed.
I made it to 9/5 inches.
Just Remember :-
- Start each round with Chain 1(Not Counted as a Stitch, 1 Single Crochet in the same stitch.
- Mark each corner stitch.
- 3 Single Crochets in the marked corner stitches.
- As the size of the rectangle grows, the Single Crochets between the marked stitches will keep increasing.

Turn your work i.e. we will be working on the inside of the basket.
1 Slip Stitch in each stitch across, starting from one end to the opposite side.
Chain 1 and Turn.
1 Single Crochet in each stitch.
Chain 1 and turn.
Repeat 1 Single Crochet in each stitch untill its around 3 inches and weave off.
If you wish to make a deeper basket, make more rounds to increase the size of the Divider.


Join yarn at the bottom stitch just below the Partition.
1 Backloop Single Crochet in each stitch around.
Once you reach the sides of the partition, yarn over and pull up a loop through the side stitch of the partition as well.
This way we will be able to join the partition along with the running stitches.
Do not slip stitch, we will be working in continuous rounds.


1 Single Crochet in each stitch untill the corner.
Once you reach the corner stitch:-
Yarn Over and pull up a loop, but do not finish the stitch.
In the next stitch, yarn over and pull up a loop, again do not finish the stitch.
You should have 3 loops on the hook.
Drop the first Loop , you should have 2 loops on the hook, yarn over and pull through these two loops.
Insert your hook into the dropped stitch.
Yarn over and pull through both the loops.
This will ensure perfect turned corners.
Continue with Single Crochets.
Once you reach the partition:-
Once you reach the sides of the partition, yarn over and pull up a loop through the side stitch of the partition as well.
This way we will be able to join the partition along with the running stitches.
Do not slip stitch, we will be working in continuous rounds.
Keep repeating untill the size needed.
Slip stitch at the end and weave off.


Here is the Summary of the Pattern:-
Round 1:-
Start with a slip knot.
Ch 11.
1 SC in the 2nd Ch from the Hook.
1 SC in rest of the Sts untill the last St.
3 SC in the last St.
Continue working on the opposite side.
1 single each in rest of the Sts untill the last St.
3 SC in the last St.
SL on top of the 1st SC.
Round 2:-
Ch 1(Not Counted as a St)
1 SC in the same St.
1 SC each in rest of the Sts untill you reach the turning 3 SCs.
3 SCs and mark the 2nd St with a St marker.
This would be the St for making the increase in the next round.
1 SC in the next St.
3 SCs in the next St.
Again mark the 2nd St with a marker.
Continue with 1 SC in the remaining Sts untill the next turning 3 SCs
Repeat the same on this side too.
3 SCs and mark.(Mark the middle St)
1 SC in the next St.
3 SCs in the next St.(Mark the middle St)
SL on top 1st SC.
Round 3:-
Ch 1(Not Counted as a St)
1 SC in the same St.
1 SC each in rest of the Sts untill you reach the turning 3 SCs.
3 SCs and mark the 2nd St with a St marker.
1 SC each in the next Sts untill the next corner.
3 SCs in the next St.
Again mark the 2nd St with a marker.
Continue with 1 SC in the remaining Sts untill the next turning 3 SCs
Repeat the same on this side too.
3 SCs and mark.(Mark the middle St)
1 SC each in the next Sts untill the next corner.
3 SCs in the next St.(Mark the middle St)
1 SC each in the next Sts.
SL on top 1st SC.
Round 4 Onwards:-
Keep Repeating round 3 untill you reach the size needed and weave off.
I made it to 9/5 inches.
Just Remember :-
Start each round with Ch 1(Not Counted as a St, 1 SC in the same St.
Mark each corner St.
3 SCs in the marked corner Sts.
As the size of the rectangle grows, the SCs between the marked Sts will keep increasing.
Divider:-
Turn your work i.e. we will be working on the inside of the basket.
1 SL in each St across, starting from one end to the opposite side.
Ch 1 and Turn.
1 SC in each St.
Ch 1 and turn.
Repeat 1 SC in each St untill its around 3 inches and weave off.
If you wish to make a deeper basket, make more rounds to increase the size of the divider.
Turning Base:-
Join yarn at the bottom St just below the Partition.
1 Backloop SC in each St around.
Once you reach the sides of the partition, yarn over and pull up a loop through the side St of the partition as well.
This way we will be able to join the partition along with the running Sts.
Do not SL, we will be working in continuous rounds.
Sides of the Basket:-
1 SC in each St untill the corner.
Once you reach the corner St:-
Yarn Over and pull up a loop, but do not finish the St.
In the next St, yarn over and pull up a loop, again do not finish the St.
You should have 3 loops on the hook.
Drop the first Loop , you should have 2 loops on the hook, yarn over and pull through these two loops.
Insert your hook into the dropped St.
Yarn over and pull through both the loops.
This will ensure perfect turned corners.
Continue with SCs.
Once you reach the partition:-
Once you reach the sides of the partition, yarn over and pull up a loop through the side St of the partition as well.
This way we will be able to join the partition along with the running Sts.
Do not SL, we will be working in continuous rounds.
Keep repeating untill the size needed.
SL at the end and weave off.
********
.png)

.png)

.png)
Hi Raji :) I really love this design! Adding the divided to the rectangle basket is so smart. Thank you for linking up at our weekly Link Party! You are being featured at our Wednesday Party #434 this week. Here’s the direct link to the post in case you’d like to share your feature: https://oombawkadesigncrochet.com/2022/01/divided-rectangle-basket-cailleach-capelet-mackenzie-seahorse-link-party-434.html
ReplyDeleteHope to see you again next week! Rhondda
So glad u like it ☺️☺️☺️☺️
Delete.... Its always a delight to be featured 🤗☺️☺️☺️ thank you so much ☺️
Looking forward to trying this. Thanks!
ReplyDelete😊😊
Delete