

Crochet Hexagons are a popular choice for making up pretty crochet blankets. But don't just stick to Blankets, these would also be great for many more variety of crochet projects right from a Crochet Bags, Rugs, Shawls , Potholders and Tablemats or you can just use them as Crochet Coasters.
Today am sharing the pattern for Pointed Crochet Solid Half Hexagon. These pointed crochet solid half hexagons are made similarly to the basic solid hexagon pattern, but the difference is that these are worked in back and forth rows and the full hexagons are worked in the round. To cover up this difference in the Front and Back rows, the stitches are worked in between each of the stitches. This pattern is made up in a way that there are literally no gaps in the finished hexagon.
You can use these half hexagons to fill the gaps between the full hexagons and create straight edges for your crochet projects. You can make these hexagons as big or small as you like. Just continue adding more rounds to increase the size and customize the size to meet your needs for your crochet project.
There are 2 different ways of making a Half Crochet Hexagon.
1. Pointed Half Hexagon
2. Flat Half Hexagon.
Today I will share the pattern for Pointed Crochet Solid Half Hexagon and in my next post I will be sharing the pattern for the Flat Half Hexagon.
Materials Used:-
8 Ply Cotton Yarn
4 mm Crochet Hook
Notes:-
For this pattern, instead of working in circle, each Round is made by working To and Fro. So to hide the difference in these Front side and the Back side rounds, we will be making the stitches in between each of two stitches i.e. Instead of inserting your hook only on top of the stitch, yarn over and insert your hook under the whole stitch.
You Might Also Like to Checkout these Tutorials for Hexagon Pattern:-
Here is the Video Tutorial:-
You can follow along with this tutorial video. Please be sure to subscribe too!
PIN it and Save for Later:-

Let's Start...!!!
Round 1:-
Start with a Magic Circle.
Chain 2(This wont be counted as a stitch)
7 Double Crochets in the Magic Circle.
Pull the yarn end to close the gap.
This will form a semi circle.
Once you reach end, Chain 2.
Straight Edge Turning Chain:-
Usually you would Chain 2, turn and start working the next round. Here is a quick tip to have a nice straight edge .
- Insert the hook into the 1st chain from the bottom.
- Yarn over and pull up a loop. You should have 2 loops on the hook.
- Turn your project and insert the hook into the first stitch.(the first Double Crochet)
- Yarn over and pull up a loop. You will have 3 loops on the hook.
- Again, yarn over and pull through 2 loops. You will have 2 loops on the hook.
- Lastly, yarn over and pull through 2 loops.
- This will make one Double Crochet.


Round 2:-
(1 Double Crochet is already made while making the turning chain)
1 Double Crochet in the same stitch.(that's total 2 Double Crochets) - remember to make these stitches in between each stitch , as mentioned in the notes.
2 Double Crochets each in next 2 stitches.
3 Double Crochet in the next stitch.
2 Double Crochets each in the next 3 stitches.
Once you reach the end Chain 2 and turn your project - Use the Straight Turning Chain method mentioned in the previous round.


Round 3:-
(1 Double Crochet is already made while making the turning chain)
1 Double Crochet in the next stitch.
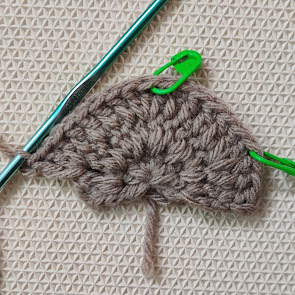
3 Double Crochets in the next stitch.(Mark the middle stitch with a stitch marker. This will be the stitch where we will be making the increase in the next round)
1 Double Crochet each in the next 4 stitches.
3 Double Crochets in the next stitch.(Mark the middle stitch with a stitch marker. This will be the stitch where we will be making the increase in the next round)
1 Double Crochet each in the next 4 stitches.
3 Double Crochets in the next stitch.(Mark the middle stitch with a stitch marker. This will be the stitch where we will be making the increase in the next round)
1 Double Crochet each in the next 2 stitches.
Once you reach the end Chain 2 and turn your project - Use the Straight Turning Chain method.


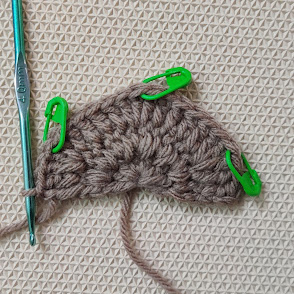


(1 Double Crochet is already made while making the turning chain)
1 Double Crochet in each of the stitches untill the marked corner.
3 Double Crochets in the next stitch.(Mark the middle stitch with a stitch marker.
Repeat((1DC in each stitch untill the corner) 3DC in the marked stitches i.e the corner))
Once you reach the end Chain 2 and turn your project - Use the Straight Turning Chain method .


Round 5 Onwards:-
Keep repeating Round 4 untill the size needed.


The first one is made by working in-between the stitches and the second one is made by working in the stitches.

Here is the Summary of the Pattern:-
Round 1:-
Start with a Magic Circle.
Ch 2(This wont be counted as a St)
7 DCs in the Magic Circle.
Pull the yarn end to close the gap.
This will form a semi circle.
Once you reach end, Ch 2.
Straight Edge Turning Ch:-
Usually you would Ch 2, turn and start working the next round. Here is a quick tip to have a nice straight edge .
Insert the hook into the 1st Ch from the bottom.
Yarn over and pull up a loop. You should have 2 loops on the hook.
Turn your project and insert the hook into the first St.(the first DC)
Yarn over and pull up a loop. You will have 3 loops on the hook.
Again, yarn over and pull through 2 loops. You will have 2 loops on the hook.
Lastly, yarn over and pull through 2 loops.
This will make one DC.
Round 2:-
(1 DC is already made while making the turning chain)
1 DC in the same stitch.(that's total 2 Double Crochets) - remember to make these stitches in between each stitch , as mentioned in the notes.
2 DCs each in next 2 stitches.
3 DC in the next stitch.
2 DCs each in the next 3 stitches.
Once you reach the end Chain 2 and turn your project - Use the Straight Turning Chain method mentioned in the previous round.
Round 3:-
(1 DC is already made while making the turning Ch)
1 DC in the next St.
3 DCs in the next St.(Mark the middle St with a St marker. This will be the St where we will be making the increase in the next round)
1 DC each in the next 4 Sts.
3 DCs in the next St.(Mark the middle St with a St marker. This will be the St where we will be making the increase in the next round)
1 DC each in the next 4 Sts.
3 DCs in the next St.(Mark the middle St with a St marker. This will be the St where we will be making the increase in the next round)
1 DC each in the next 2 Sts.
Once you reach the end Ch 2 and turn your project - Use the Straight Turning Ch method.
Round 4:-
(1 DC is already made while making the turning Ch)
1 DC in each of the Sts untill the marked corner.
3 DCs in the next St.(Mark the middle St with a St marker.
Repeat((1DC in each St untill the corner) 3DC in the marked Sts i.e the corner))
Once you reach the end Ch 2 and turn your project - Use the Straight Turning Ch method.
Round 5 Onwards:-
Keep repeating Round 4 untill the size needed.
*******
.png)


No comments:
Post a Comment
Thank you for taking time to stop by. I would love if you leave some inspiring comments about the post. To avoid spam , your comment will be verified and posted in sometime. Thank you!!!