

What would be better than a Basket when you think of organizing your stuff. I love making Crochet Baskets. They are a great option if you are looking out for a quick organizing crochet project. Using the same pattern you can make them in various sizes of your choice by increasing the number of rounds in the base of the basket.
Today am sharing the Pattern for this pretty dual toned Rectangle Basket with handles. The handles of the basket makes it very easy to carry around.
Materials Used:-
Bulky Yarn
6mm Crochet Hook
Notes:-
For the whole pattern the Starting Chain 1 is not counted as a stitch.
It is just to bring the yarn to a working height.
AD-FREE, PRINTER-FRIENDLY PDF PATTERN:
The written pattern and photo tutorial is given below along with a free video tutorial. This pattern is also available as an ad-free, printer-friendly pdf pattern that can be purchased on Ravelry . Please click the link below to purchase the PDF Pattern.
Here is the Video Tutorial:-
Here are some more Basket Patterns which you might like:-
- Macrame Cord Crochet Round Basket With Handles
- Crochet Square Basket
- Crochet Christmas Gift Basket
- Make Your Own Crochet Oval Basket With Handles
- Make Your Own Rectangle Crochet Basket
- Teddy Bear Crochet Basket - Free Pattern
- Crochet Macrame Cord Basket - Guest Post For Undergroundcrafter
- Make Your Own Crochet Oval Basket - Free Pattern
- Make Your Own Chunky Yarn Basket
- Crochet Heart Gift Basket
- Easter Basket
- Crochet Utility Mini Basket
Let's Start.....!!!
Round 1:-
Start with a slip knot.Chain 11.
1 Single Crochet in the 2nd Chain from the Hook.
1 Single Crochet in rest of the stitches untill the last stitch.
1 Single Crochet in rest of the stitches untill the last stitch.
3 Single Crochet in the last stitch.
Continue working on the opposite side.
1 Single Crochet each in rest of the stitches untill the last stitch.
1 Single Crochet each in rest of the stitches untill the last stitch.
3 Single Crochet in the last stitch.
Slip stitch on top of the 1st Single Crochet.


Chain 1(Not Counted as s Stitch)
1 Single Crochet in the same stitch.
1 Single Crochet in the same stitch.
1 Single Crochet each in rest of the stitches untill you reach the turning 3 Single Crochets.
3 Single Crochets and mark the 2nd stitch with a stitch marker.
This would be the stitch for making the increase in the next round.
This would be the stitch for making the increase in the next round.
1 Single Crochet in the next Stitch.
3 Single Crochets in the next stitch.
Again mark the 2nd stitch with a marker.
Continue with 1 Single Crochet in the remaining stitches untill the next turning 3 Single Crochets
Again mark the 2nd stitch with a marker.
Continue with 1 Single Crochet in the remaining stitches untill the next turning 3 Single Crochets
Repeat the same on this side too.
3 Single Crochets and mark.(Mark the middle stitch)1 Single Crochet in the next Stitch.
3 Single Crochets in the next stitch.(Mark the middle stitch)
Slip Stitch on top 1st Single Crochet.


Keep Repeating round 2 untill you reach the size needed.
Just Remember :-
- Start each round with Chain 1(Not Counted as a Stitch, 1 Single Crochet in the same stitch.
- Mark each corner stitch.
- 3 Single Crochets in the marked corner stitches.
- As the size of the rectangle grows, the Single Crochets between the marked stitches will keep increasing.


Start with Chain 1.(Not Counted as a stitch)
1 Backloop Single Crochet in the same stitch.
1 Backloop Single Crochet in the same stitch.
1 Backloop Single Crochet in the remaining stitches.
Once you reach the end do not slip stitch. We will be working in continuous rounds.


Continue making 1 Single Crochet in each and every stitch around untill the size needed.
Change the yarn color for the last 3 rounds.


Mark the 4 stitches next to the corner most stitch with stitch markers.
1 Single Crochet in each stitch untill you reach the first marked stitch.
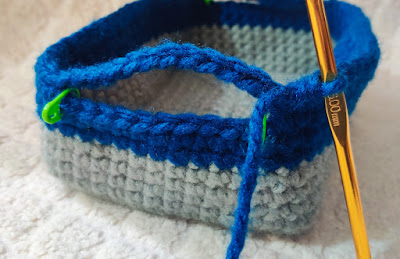
Chain 12.
Skip the stitches between the two marked stitches and 1 Single Crochet into the stitch next to the marked stitch.
This will make the 1st handle.
1 Single Crochet in each stitch untill you reach the next corner.
Repeat the same as the first handle.


1 Single Crochet in each stitch untill you reach the handle.
12 Single Crochets on the handle Chain Stitches.
Continue with 1 Single Crochet in each stitch untill the next handle.
Repeat the same as the 1st handle.
1 Single Crochet each in the remaining stitches.
Slip stitch and weave off.


Here is the Summary of the Pattern:-
Round 1:-
Start with a Slip knot.
Ch11.
1 SC in the 2nd Ch from the Hook.
1 SC in rest of the stitches untill the last stitch.
3 SC in the last stitch.
Continue working on the opposite side.
1 SC in rest of the stitches untill the last stitch.
3 SC in the last stitch.
Slip stitch on top of the 1st SC.
Round 2:-
Ch1(Not Counted as s Stitch)
1 SC in the same stitch.
1 SC each in rest of the stitches untill you reach the turning 3 SCs.
3 SCs and mark the 2nd stitch with a stitch marker.
This would be the stitch for making the increase in the next round.
1 SC in the next Stitch.
3 SCs in the next stitch.
Again mark the 2nd stitch with a marker.
Continue with 1 SC in the remaining stitches untill the next turning 3 SCs
Repeat the same on this side too.
3 SCs and mark.(Mark the middle stitch)
1 SC in the next Stitch.
3 SCs in the next stitch.(Mark the middle stitch)
Slip Stitch on top 1st SC.
Round 3 onwards:-
Keep Repeating round 2 untill you reach the size needed.
Just Remember :-
Start each round with Ch1(Not Counted as a Stitch, 1 SC in the same stitch.
Mark each corner stitch.
3 SCs in the marked corner stitches.
As the size of the rectangle grows, the SCs between the marked stitches will keep increasing.
Turning Base:-
Start with Ch1.(Not Counted as a stitch)
1 Backloop SC in the same stitch.
1 Backloop SC in the remaining stitches.
Once you reach the end do not Slip stitch. We will be working in continuous rounds.
Sides of the Basket:-
Continue making 1 SC in each and every stitch around untill the size needed.
Change the yarn color for the last 3 rounds.
Handles:-
Mark the 4 stitches next to the corner most stitch with stitch markers.
1 SC in each stitch untill you reach the first marked stitch.
Ch12.
Skip the stitches between the two marked stitches and 1 SC into the stitch next to the marked stitch.
This will make the 1st handle.
1 SC in each stitch untill you reach the next corner.
Repeat the same as the first handle.
Border:-
1 SC in each stitch untill you reach the handle.
12 SCs on the handle Ch Stitches.
Continue with 1 SC in each stitch untill the next handle.
Repeat the same as the 1st handle.
1 SC each in the remaining stitches.
Slip stitch and weave off.
*****


Pretty basket raji.
ReplyDeleteThank you so much!!😊😊
Delete