
If you are looking for a quick crochet project, then here it is. Crochet coasters are among the easiest patterns to make. They are simple , easy and pretty much work up quickly. You can whip up one in no time at all and they are usually very beginner friendly.
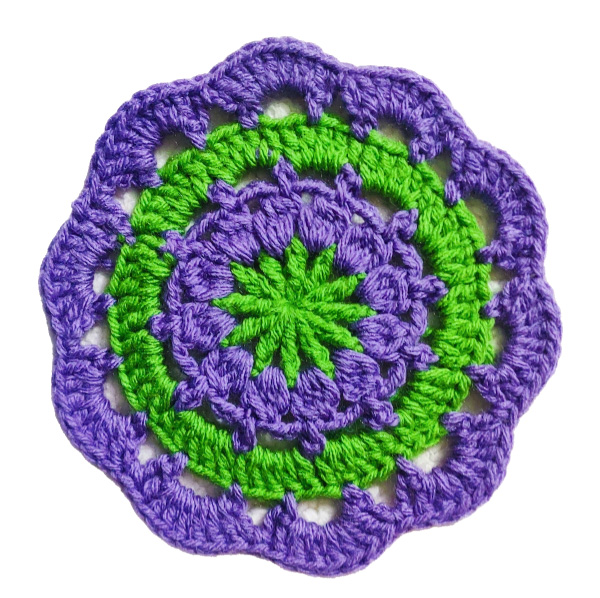
Today am sharing the pattern for a very easy and quick Tea Crochet Flower Coaster .I have used two shades of colors. Play around with the color tones to make one of your choice. These would be great for using up your scrap yarn. Protect your tables from stains with these pretty coasters and they are great for gift giving too!!
Materials Used:-
8 Ply Yarn
4mm Crochet Hook
Here is the Video Tutorial:-
Round 1:-
Start with a Magic Circle.
Chain 5(The starting 4 Chains will be counted as 1 Treble Crochet and the remaining 1 Chain will will counted as Chain 1 space.
1 Treble Crochet,
Chain 1.
Repeat*(1Trbl, Chain 1) untill you have 12 Chain 1 spaces.
Pull the yarn end to close the gap.
Slip stitch into the 4th Chain.
Change color while making the slip stitch.


Slip Stitch into the chain space.
1 Double Crochet Cluster in the Chain space.
Chain 2.
Repeat(1DC Cluster, Chain 2)
Slip stitch on top of the first Cluster stitch.
To Make a Double Crochet Cluster Stitch:-
- Chain 2(Not Counted as a stitch. It's just to bring the yarn to a working height)
- Yarn over, insert the hook into the stitch, yarn over and pull through 2 loops on the hook.(This is same as doing a Double Crochet Stitch. It is just that , you don't finish the Double Crochet Stitch and continue doing the first part of the Double Crochet Stitch again and again).You should have 2 loops on the hook.
- Yarn over, insert the hook in the same stitch, yarn over and pull through 2 loops. You should have 3 loops on the hook.
- Continue with the first part of Double Crochet stitch untill you have 5 loops on the hook.
- Yarn over and draw the yarn through all 5 loops on the hook.
- Chain 1.


Chain 5.
1 Single Crochet on top of the next Cluster Stitch.
Repeat(Chain 5, 1SC)


Slip Stitch into the chain space.
Change color while making the slip stitch.
Chain 2(Not Counted as a stitch)
5 Double Crochet in the same space.
Repeat 5DC in each chain spaces.
Slip stitch on top of the first Double Crochet.
Change color while making the slip stitch.


Chain 5.
Slip 2 stitches.
1 Single Crochet in the next stitch.
Repeat(Chain 5, Skip 2, 1 SC).

Round 6:-
Slip Stitch into the chain space.
Chain 2(Not Counted as a stitch)
5 Double Crochet in the same space.
1 Single Crochet in the next Chain space.
Repeat(5DC,1SC).
Slip stitch on top of the first Double Crochet.
Weave off the yarn ends.


Here is the Summary of the Pattern:-
Round 1:-
Start with a Magic Circle.
Chain 5(The starting 4 Chains will be counted as 1 Treble Crochet and the remaining 1 Chain will will counted as Chain 1 space.
1 Treble Crochet,
Chain 1.
Repeat*(1Trbl, Chain 1) untill you have 12 Chain 1 spaces.
Pull the yarn end to close the gap.
Slip stitch into the 4th Chain.
Change color while making the slip stitch.
Round 2:-
Slip Stitch into the chain space.
1 Double Crochet Cluster in the Chain space.
Chain 2.
Repeat(1DC Cluster, Chain 2)
Slip stitch on top of the first Cluster stitch.
Round 3:-
Chain 5.
1 Single Crochet on top of the next Cluster Stitch.
Repeat(Chain 5, 1SC)
Round 4:-
Slip Stitch into the chain space.
Change color while making the slip stitch.
Chain 2(Not Counted as a stitch)
5 Double Crochet in the same space.
Repeat 5DC in each chain spaces.
Slip stitch on top of the first Double Crochet.
Change color while making the slip stitch.
Round 5:-
Chain 5.
Slip 2 stitches.
1 Single Crochet in the next stitch.
Repeat(Chain 5, Skip 2, 1 SC).
Round 6:-
Slip Stitch into the chain space.
Chain 2(Not Counted as a stitch)
5 Double Crochet in the same space.
1 Single Crochet in the next Chain space.
Repeat(5DC,1SC).
Slip stitch on top of the first Double Crochet.
Weave off the yarn ends.
******
.png)


Beautiful coaster raji.
ReplyDeleteThank you ☺️
DeleteThank you for this pattern. It is very well written with great pictures. I look forward to making these in the future
ReplyDeleteGlad you like it...☺️ Thank you so much ☺️
Delete